Showing posts with label tutorial. Show all posts

Thursday, August 22, 2013

Cloudy's Chalkboard: Email Template Pro Tips!

Salesforce Pro Tips
In Cloudy's last two posts, you learned how to set up salesforce.com email letterheads and templates. Once you get started with email templates, you won't want to quit! The possibilities for saving time and streamlining processes are many, but you will encounter questions and roadblocks as your imagination kicks in. Here are a couple of Cloudy's favorite Pro Tips for getting the most out of Email Templates:

Pro Tip #1: Merging information from related records

You may have noticed that unlike elsewhere in salesforce.com (such as in the advanced formula editor), the Merge Field menu does not allow you to navigate through layers of related records to grab the Merge Field you want. For instance, if you are sending a Contact-related email, you cannot insert a field from their related Account record.

Get around this by adding a formula field to the Contact record which captures the related Account field that you need for your email! You don't have to put this field on your page layout, and you may want to give it a distinctive name and description so that you and other administrators can easily remember its function.  ie. "THIS IS AN EMAIL TEMPLATE FORMULA FIELD!"

Pro Tip #2: "Sending User" Information


If you have numerous reps all using the same Template to email Contacts, you may want a way for each rep's contact information to populate in the template automatically - for instance, as a personalized "signature".


Simply select "Sending User Fields" from the "Select Field Type" picklist.  Whereas most of your template merge fields must come from the Object that the email will be related to (ie. "Contact"), the Sending User fields are an exception.
This merge field will allow the recipient to easily call the rep who sent the email.
**IF YOUR "SENDING USER" MERGE FIELDS ARE NOT POPULATING CORRECTLY: check that the correct user information is entered on the User record!

Pro Tip #3: Dynamic URLs

You can add a basic URL link by:

1: Type the text as you would like it to appear and highlight it.
2: Click the LINK icon on the tool bar.
3: Enter the web url in the box that appears.


But what if you don't want to link to a STATIC website, and instead you want to send a dynamic/individualized URL based on the record you are sending from?

Simply create a URL field on the primary object, and populate it with your individualized URL links. Then on your template, follow the same steps as above but paste the MERGE FIELD for your new URL field in the text box.
You now have a dynamic URL link that will change based on the record it is sent from!

These are just a few of Cloudy's favorite email template tips.  If you have more questions about advanced functionality with salesforce.com email templates, Contact Us!

Related Posts:

Cloudy's Chalkboard: How to Create an Email Letterhead

Cloudy's Chalkboard: How to Create an Email Template


Monday, August 5, 2013

Cloudy's Chalkboard: How to Create an Email Template

Hopefully you are already using the emailing capabilities of salesforce.com to not only streamline and automate your email processes, but to capture relevant records of all your client communications!

Last time, Cloudy illustrated the steps to create an email letterhead. A themed letterhead with your logo will give your emails a consistent, branded look and feel. Today we will create an email template.  


With email templates you get simplicity and quality control:
  • Standardize the email messages used by your team.
  • Keep all messaging in line with your brand.
  • Enhance speed and productivity.
  • Personalize with easy merge fields.
Step 1: Create a new email template Go to Setup>Communication Templates>Email Templates.
  • If you do not have any custom template folders set up, this is a good time to create one! Just click the "Create New Folder" link next to the Folders menu and give your new folder a distinctive name, such as "Your Company Name Email Templates".
  • Click the "New Template" button.
  • Select "HTML (Using Letterhead)" 
Step 2: Name your template
  • Confirm the correct destination folder is selected.
  • Check the "Available For Use" check box.
  • Name your template - be descriptive!
  • Select the Letterhead you created last time from the menu
  • Choose an email layout; for your first template, try the "Free Form Letter" and check out the other options at another time.
  • Enter a detailed description of the content and intended use of this template.
  • Click "Next".
Step 3: Compose your email template Read the tips at the top of this salesforce.com page!
  • Start by typing the text as you would like it to appear. Note where you would like to insert merge fields; for instance "Dear FIRST NAME,"...
  • When the basic text is in place, you are ready to insert merge fields! In the "Available Merge Fields" tool bar, select the OBJECT that this email will be sent from or related to. CONTACT is the most common choice, but Leads and Opportunities are also common. The Object you choose should be the one that contains the information you want to use as merge fields.
  • After selecting the object, find the field you want from the second picklist. ie. "First Name"
  • The Merge Field "code" will appear highlighted in the third field of the tool bar. Copy and paste it into the correct position in your template.

  • When you are ready to test the template, click next, copy your content into the Text-only editor, and click "Save." Now you will see a button to "Send test and verify Merge fields."  If the test goes well, your template is complete!
Tune in next week for Cloudy's Email Template Pro Tips!

If you would like Cloudy's help with salesforce.com templates or anything else, please CONTACT US!


Monday, June 17, 2013

Cloudy's Chalkboard: How to Create an Email Letterhead

Creating an email letterhead is the first step toward fully harnessing the power of email from within salesforce.com.
If you are not already using email within (or integrated with) your salesforce.com, let's briefly consider a few benefits of doing so:
  • 360 degree view of all communication with a Contact:  As you and your teammates communicate with your contacts, all emails are tracked on the contact record so that everyone can see the full story of those interactions (alongside logged calls and other activities).
  • Automation: If you are using the Enterprise or Unlimited edition of salesforce.com, email messages can be automatically sent and logged, based on criteria you set.
  • Consistent messaging: By utilizing Letterheads and Templates, you can standardize your messaging, reduce the time spent composing emails, and give all your emails a consistent brand identity, using a Letterhead with your colors and logos.

Get started down this path by following along with Cloudy to create a salesforce.com letterhead like this simple example:

With just a logo and a few color choices,
 Redpath now has a letterhead that will ensure a consistent,
branded look for all of their outgoing email.

Step 1: Upload your logo (or other image) to the Documents tab in your salesforce.com. 
  •  If you cannot see this tab, find it by clicking the "+" to the right of your tabs.  
  • If you don't have any document folders set up, you can create one by clicking the "Create New Folder" link.  For instance, create a folder called "Logos."
  • Before uploading, make sure the logo is the exact size you want for the Letterhead.  Unlike other familiar document and image interfaces, such as Word or Google Docs, you will not be able to adjust the size of the image after loading it. (If you make a mistake on the size of the image, simply replace your original image or load it as a separate document.
  • Be sure to select the "Externally Available Image" checkbox!

Step 2: Create the Letterhead Go to Your Name> Setup> Communication Templates> Letterheads> New Letterhead.

  • Give your letterhead a descriptive name and be sure to check the "Available for Use" checkbox. Click "Next".
  • On the Letterhead edit page which appears, add your Logo by clicking the "Select Logo" button and finding the logo you uploaded in the correct folder.  If you do not see your logo in the correct folder, you probably forgot to select the "Externally Available Image" checkbox!  You can fix it by going back to the Documents tab, find the logo, click "edit" and select the checkbox.
  • Click through the other "Edit" boxes on the Letterhead editor to choose colors and styles for the rest of the letterhead.
  • Click the "Preview" button above the editor to see how it looks!
  • Click "Save".  (You can always come back and edit it more later)
Your Letterhead is ready to use. Try it out by navigating to a contact record and clicking "Send an Email." on the Activity History related list.  At the top of the email interface that appears, you will see a "Select Template" button.  (If you do not see your template in the pop-up dialogue, you probably forgot to select the "Available for Use" checkbox!  You can fix it by going back to the Letterheads page, clicking "edit" next to your letterhead, and marking the checkbox on the edit page.) With just this set up, you can send free form emails from salesforce.com that will have a consistent company brand, and the emails will be automatically attached to the correct contact records.

Next week, Cloudy will help you reach the next level of emailing in salesforce.com by creating Email Templates!

Read more Cloudy's Chalkboard tutorials:
Cloudy's Dashboard - Create Roll-up Summaries
Cloudy's Dashboard - Creating Dashboards


Monday, June 3, 2013

Cloudy's Favorite Apps: Apsona

Have you ever wished you could import and export all of your salesforce.com data without firing up an external application or digging out your security token?

Have you ever encountered the limits of Salesforce.com reporting, wished that you could create more sophisticated reporting filters, or gotten frustrated while managing a list of custom report types?

How much time would you save if you could perform inline-editing on a whole list of records, without clicking into each one individually?

What if you could realize all of these functions and more with a single inexpensive app?

Apsona is one of Cloudy's favorite AppExchange apps, with such varied and powerful functionality that it can benefit any organization. What's more, nonprofits have access to 10 free licenses! 

Cloudy recently created an awesome report for a nonprofit client, allowing them to see which of their donors contributed to last year's matching grant Campaign, but did not contribute to the same Campaign this year. This insight will enable them to do a targeted and informed "ask" of those invested donors for this year's matching grant challenge!  The information on how to create this report using nested filters was right on the Apsona website:


The Apsona Website has lots of eye-opening use-cases and tutorials like this one!
Surely you are already considering the possibilities, but here are even more exciting ideas to ponder:

-Create Exception Reports: ie. Show all Accounts WITHOUT Opportunities
-Quickly change record ownership en mass.
-Import into multiple objects.
-Cleanse and import data in a single, integrated process.

Visit this page for some short, informative demos to see how powerful yet simple Apsona can be: Apsona Demos on the AppExchange 

If you would like help evaluating this App for your salesforce.com, installing it, or creating your first custom reports, CONTACT US!


Read Cloudy's reviews of other popular Apps:
Form Assembly
Conga Composer
Flip Top Social Profiles
Dupe Catcher
Rollup Helper


Monday, April 15, 2013

Cloudy's Favorite Apps: Rollup Helper

Last week, Cloudy demonstrated how to set up a simple Roll-up Summary field in your Salesforce.com org.  If you are already using Roll-up Summary fields, you know how useful they are for understanding your data and creating meaningful reports.

But if you are a fan of Roll-ups, then you are probably frustrated by their limitations as well!

Roll-up Summary fields can only be created on Master objects in Master-Detail relationships, and there are tight limits on the numbers and configurations of Master-Detail relationships in an org.  If you have run into these limits, you have probably wished that Roll-Up Summary fields could be set up on simple Look-up relationships.

Well now they can!  Rollup Helper, from Passage Technology has created an App that allows you to create Roll-up Summaries almost anywhere.  Not only that, it also expands the concept of Roll-ups beyond counts, sums, and min/max to include concatenated text and formulas.  Consider these cases:

-Display an aggregated count and description of all products purchased on an account record.
-Count the Events or Tasks of a certain type on account or contact records.
-Display the number of campaigns that a contact has participated in.
-Count the numbers of contacts of certain types on accounts.
-Calculate membership renewal dates and amounts, based on information in related records.

The list could go on and on, but perhaps these ideas have sparked your imagination!


Rollup Helper is available in a FREE Community Edition, or as a paid, supported app.  The version that is right for you will depend on your organization's needs.  The free version is not supported beyond helping you set up your first roll-up, and there is some lag-time on the roll-ups, especially for very large amounts of data.  The paid version includes unlimited tech support to set up your roll-ups and answer questions, as well as fast-paced, real-time calculations on large quantities of data.

Cloudy recommends that anyone who is interested in more roll-ups with more flexibility start with the free version of Rollup Helper.  As your organization gains value from the tool, you will be able to gauge whether you require the additional support and processing power of the paid app.

Cloudy always recommends trying an app for the first time in your Sandbox!  

Read Cloudy's reviews of other popular apps:
Conga Composer
FlipTop Social Profiles
FormAssembly

Tuesday, April 9, 2013

Cloudy's Chalkboard: Create Roll-up Summaries

Roll-up Summary fields are a way to view accumulated data from Detail records on a Master Record in Salesforce.  The Roll-up can calculate sums, counts, minimums or maximums.

A Rollup Summary on an Account (Organization) record could calculate the total of all related Opportunities (or Donations).  It could also show the maximum or largest sale on each account.  Your salespeople would have a quick gauge of how much a customer has bought and might be willing to buy, and you can run reports showing your best customers.

A Roll-Up Summary field can be created on any Master record in a Master-Detail relationship, including any custom objects.  Follow Cloudy's instructions to create a Roll-Up Summary in your Salesforce Org, and you may soon wonder how you lived without them!

**************

For this example, we will create a Roll-up Summary showing the total value of all Closed-Won Opportunities on an Account record.  You can follow the same steps to create a Roll-up on any Master record with related detail records.

1) Go to Your Name > Setup > Customize > Accounts > Fields


2) Click the "New" button in the "Custom Fields and Relationships" area.


(Click on any image to view larger)


3)Select "Roll-Up Summary" as the field type and click "Next".


4) Name your field.  For this example, let's name it "Account Sales Total" and in the Help & Description fields, we will indicate that only Closed-Won Opportunities are summed.  Click "Next".
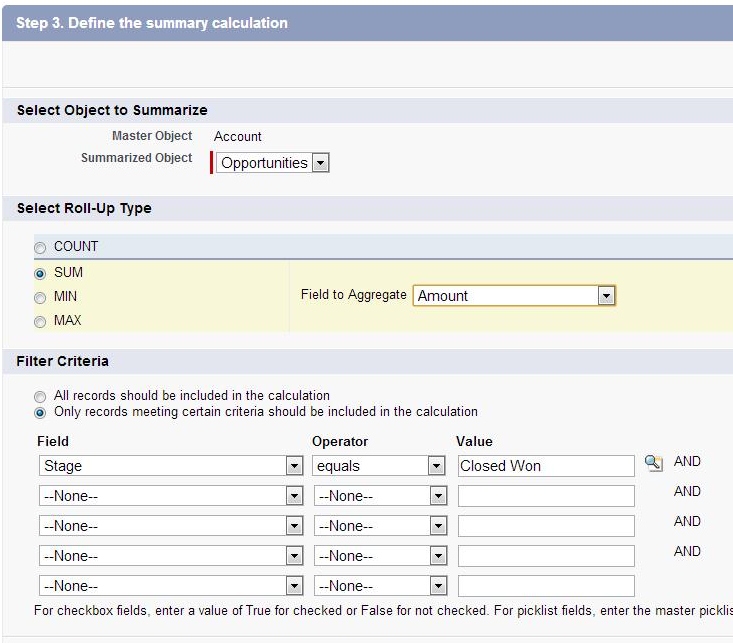
5) From the "Select Object to Summarize" picklist, select "Opportunities".

Under "Select Roll-Up Type", choose "SUM", and from the "Field to Aggregate" picklist, select "Amount."

In the "Filter Criteria" section, we will set the parameters to only include Closed Won Opportunities.  Select the "Only certain records..." radio button, which opens up the Filter Criteria picklists.  For our example, we will set a filter of "Stage + Equals + Closed Won".

6) Click "Next", "Next", and "Save" to finish creating the field.  Go to the page layout for Accounts to set the placement of the new field, and then view it on your Account records!

**************

Roll-up summaries are a great way to get better insight into your data, both at the record-level and for reporting.  As you start to leverage the power of roll-up summaries, you might find you wish you had greater flexibility than Salesforce roll-ups allow.  For instance: the ability to roll-up from activities, or between Look-up related objects.  For these cases, Rollup Helper, on the Salesforce AppExchange might be just the ticket.  Tune in next week for a Cloudy's full review of this powerful App.

If you would like more help with creating and reporting on Roll-up Summaries in your Salesforce.com org, Contact Us!

Read more Cloudy's Chalkboard tutorials:
Creating Dashboards
Grouped Bar Charts

Tuesday, January 15, 2013

Cloudy's Chalkboard: Creating Dashboards


Salesforce.com reports are a powerful tool for understanding your data, but when you have many reports, levels of complexity, and large amounts of data, it can be a lot to take in.  Charts and Dashboards are the best way to create snapshot views of your data.

Good dashboards give executives the answers to the questions they care about most, give managers a handy tool to drive meetings, and give users an organized view of the things they need to prioritize.  If you have never created a dashboard, here is a step by step tutorial to get you started.

Step 1: A dashboard is simply a visual representation of a collection of reports, so the first step is to create or identify the folder where you will store these reports.  If Cloudy is creating a Sales Dashboard, he will create a new report folder and call it "Sales Dashboard Reports."  Since report privacy is set at the folder level, now is the time to think about who gets to see this data and make the appropriate settings on the folder.  To create a new report folder, go to the Reports tab, click the folder icon at the top right of the folder menu, and select "New Report Folder."

Step 2: Create Summary or Matrix reports showing what you want to represent with your chart components  (Tabular reports cannot be used for dashboards).  The Format settings menu is found in the Preview pane of the Report Builder; if you are relatively new to report building, start with a Summary report!  Save your reports in the folder you created in Step 1.

Step 3: Create or identify the folder where you will store your dashboard.  As with reports, privacy is determined at the folder level, so consider those security questions now.  To create a new dashboard folder, go to the Reports tab, click the folder icon at the top of the left hand folder menu, and select "New Dashboard Folder."

A table can be configured to link
directly to the listed records.
Use a pie chart to show
proportions against the total.
Step 4: Create your Dashboard by going to the Reports tab and clicking the "New Dashboard" button.  Using the drag-and-drop interface, add the chart types you want to use from the "Components" tab, and then find the matching reports from the "Data Sources" tab and drag them onto the correct components.  You can use the same report for more than one chart if you want to represent the data in more than one way.

A gauge shows progress
toward a goal or a limit.
A grouped line chart show data
trends over time
                               
Step 5: Customize your chart components.  You can add a title, subtitle, and footer simply by clicking in those spaces.  Click the wrench in the upper right corner of each component to view further formatting options.   (For a tutorial on one advanced formatting option, see Cloudy's Chalkboard - Grouped Bar Charts)

When you are ready to view your completed dashboard, Click "Save As" and save the dashboard to the correct folder, then click "Close."  On the Dashboard viewing page, a "Refresh" button appears at the top of the page.  Your dashboard will not refresh automatically; you must either click the button or schedule refreshes to occur regularly by clicking the down arrow next to "Refresh" and selecting "Schedule Refresh."  On this page, you will also see the option to have a dashboard emailed to you or any other user on a recurring schedule.  This is a great way to keep managers or teams up to date.

If you have other questions about using dashboards, please leave a comment below, or Contact Us!

Cloudy Cumulus is part of Redpath Consulting Group, based in Minneapolis, MN (c) 2012

Thursday, December 20, 2012

Cloudy's Chalkboard: Grouped Bar Charts

Salesforce.com charts and dashboards create useful snapshot views of your data.  Bar charts are popular because you can easily add valuable detail to a basic bar chart by using groupings.

Look at Cloudy's examples below and then follow the step-by-step instructions to create a grouped bar chart for your report or dashboard:


Salesforce.com grouped bar charts


Step 1: Create your report.
You need to include at least 3 fields:
-Record Name or ID (ie. Activity ID)
-Group Category 1 (ie. Activity Type)
-Group Category 2 (ie. Assigned to)

Check your filters:
-Set the date filters to the time frame you are interested in.
-Add any other filters needed to zoom in on the records you want to see.

Summarize:
-In the report Preview pane, select the Format drop-down and choose "Summary."
-Drag the Group Categories into the Summary drop zones in any order you wish.

Step 2: Create your chart.

You can create a chart on a dashboard or on the report itself. 

Chart Editor:  
(these instructions assume a horizontal bar chart.  Switch X and Y axis instructions in the case of a vertical bar chart)
-If you are on the report itself, the Chart Editor appears automatically when you add a chart.  If you are on a dashboard, click the wrench icon to open Chart Editor.
-Click the "Chart Data" tab
-For the X-Axis, choose the correct measurement metric (ie. Record Count, $ amount, etc.)
-For the Y-Axis, choose the first Group Category you want to see.  These will be the bars on your chart.
-Next, click the "Group By" drop down and choose the OTHER Group Category.  
-Select the type of Grouped Bar Chart by clicking the icons below the Group By menu.  For stacked grouping like the example above, click the middle icon.

Click OK to view your Grouped Bar Chart!

Read more of Cloudy's Salesforce.com step-by-step instructions:

If you would like help creating these or other dashboard components, CONTACT US
Learn more about our Salesforce.com services HERE

Cloudy Cumulus is part of Redpath Consulting Group, based in Minneapolis, MN (c) 2012


Thursday, November 15, 2012

Test Drive an App in your Salesforce Sandbox: Ten Step Installation Instructions

If you have been using Salesforce.com for a while, you have probably heard about some of the great Salesforce.com AppExchange Apps that can add even more value and functionality to your Org.  If you are interested in trying an App, it is always advisable to take it for a test drive in your Salesforce.com Sandbox first!  If you are happy with the App after testing in your Sandbox, it only takes a few minuted to add it to your main Salesforce.com Org.

If you are an Admin in your org but have not installed an App in your Sandbox before, here are the steps to follow:

1- log in to your Org (not your sandbox!).

2-  Click the Apps tab in the far upper right corner of the screen and select “Add Appexchange Apps”.

3- Browse/search to find the app, and click it to open its detail pages.  It’s a good idea to read all the information on these pages.  Make sure the App is compatible with your edition of Salesforce.com, check the pricing and trial period details, and read a few customer reviews!

4-Click “Get it Now” on the App’s detail page.

5- If prompted, click “Log in to the AppExchange.”  On the login page, enter your login and password for your regular production org (not your sandbox!).

7- You will be given 2 choices: Install in production/ Install in Sandbox.  If you are Test Driving the App, Choose the Sandbox option.

8- Check the box next to “Terms and Conditions” and click “Confirm and Install”.

9- On the next login page that appears, use the login and password for your sandbox (If you are installing in the sandbox).

10- click the orange Install button.  Review the security details that appear on the next pages and click “Next” on each page until the “Install” button appears.  Click “Install.”

Once the app is installed, you can click your app tab in the upper right corner, and the new app will appear in that list.  By clicking on the app in this menu, you can easily view and explore the new objects (tabs) that are part of your new app.


Read more about the AppExchange or check out Cloudy's reviews of his favorite Apps:
Conga Composer
FormAssembly
FlipTop Social Profiles

Contact Us if you would like help evaluating which AppExchange apps will help you achieve your business objectives.

Cloudy Cumulus is part of Redpath Consulting Group, based in Minneapolis, MN (c) 2012

Wednesday, November 7, 2012

The Salesforce AppExchange: What does it have to offer your business?

The Salesforce.com AppExchange is a marketplace for business apps built just for the Salesforce.com community.  These apps can extend the functionality of your Salesforce.com org to fit even more of your business needs. 

If you have never visited the AppExchange, go to http://appexchange.salesforce.com/ and have a look around!  Try entering search terms relating to your business processes, and you might be amazed to find an app that is made just for you.

When you are looking at an App, click through all the info tabs to find pricing, functionality details, and customer reviews.  Some apps are free or have special pricing for Non Profits.  Many apps have free trials if you want to take a test drive.  If you want to try an app, it is advisable to install it in your sandbox first, as sometimes new apps may not play nicely with other apps.  Just click the “Get It Now” button on the app and you will be given the option to choose whether you are installing in your sandbox or main production org.

If you would like help finding the apps that can boost your business and extend your Salesforce.com, please contact us!

Read Cloudy's reviews of these popular Apps:

Form Assembly
Conga Composer
FlipTop Social Profiles