Tuesday, November 12, 2013

Cloudy's Favorite Apps: Mass Edit + Mass Update + Mass Delete

What do you do when you want to edit the addresses of a couple dozen contacts?

Or what if you need to update the Stage of numerous Opportunities at once?

Or might you wish to quickly delete all Leads who have had no activity in the past year?

This is the type of important data management that keeps your salesforce.com vital, but if it is a hassle, it might not get done.  These jobs are too small to bother with data loader, but as you search, open, and edit each record individually, you will surely wish there was a better way.

One of Cloudy's favorite FREE apps makes this possible:

Mass Edit + Mass Update + Mass Delete -- the name says it all!  After the easy installation of this app, all you need to do is go to the Search Layouts page of the standard object where you would like to use this button.  (Step by step instructions appear in the install guide on the app)

The new buttons will appear on any list view on those object tabs. For specific data management tasks, you may want to create filtered list views that narrow down a list to the records you want to Mass Edit/Update/Delete.  ie. "All Contact with No Mailing Address", "All My Opportunities in Negotiation", or "All Leads with No Recent Activity".  You will have a chance choose specifically which records you are going to edit/update/delete from a list by checking the box next to the record.

Here is an example of a "Mass Edit" view of Contact records.  
From here it's a snap to edit all four records at once and then save!  
Use Mass Edit when you want to Edit multiple records at once, but with different information for each one.  For instance, each contact above likely has different phone and address information.
Here is an example of a "Mass Update" view of Opportunity records.  
From the list view, select several Opportunities to update, and on this page choose the field to update (Stage), and the value to update to.  Use Mass Update when you want to update multiple records with the SAME information.  For instance, I can change all of these Opportunities to "Closed Lost".

BONUS:
Once you are in the groove of using Mass Edit + Mass Update + Mass Delete for your small-batch data management needs, you might wish you could use the buttons on custom objects, or that you could customize the Mass Edit fields available.  Since this free app is an "Unmanaged Package", it is possible, and easier than you might think, to extend its capabilities in these ways. You can find some how-to help among other app users on the "reviews" tab of the appexchange listing.

If you need more customization, training, or help, please Contact Us!

For instructions on test-driving an App in your salesforce.com sandbox:
Test Drive an App in your Salesforce.com Sandbox

More of Cloudy's Favorite Apps:
Dupe Catcher
Conga Composer
Form Assembly
Rollup Helper


Tuesday, October 8, 2013

Cloudy's Chalkboard: Tracking the stars in your salesforce universe - Part 2


Last week we started creating a complex dashboard table that could help a nonprofit keep tabs on its most important donors

We created the report that will be the basis for the dashboard component.  Today we will finish by actually adding it to the dashboard!

Step 1: Add a chart to your source report

In order to create a complex dashboard table, you must first add a chart to the source report. The chart on the report itself does not have to look meaningful: in fact, it usually doesn't!  

Go to your report, click  "Customize" and then click "Add Chart":

Choose a scatter chart as the type of chart, and on the chart data tab, set all four chart data fields to the meaningful groupings of your report, as shown:

Click "OK" and then Save and Run your report. You will notice that the resulting scatter chart is not very interesting as a chart, but it allows us to create a more complex dashboard table. 

**If you want to make the chart less prominent on the report itself go to the "Formatting" tab on the chart editor and choose to make the chart size "Tiny" and the chart location "Below Report"!**

Step 2: Go to your dashboard

You probably have multiple dashboards in your salesforce org; choose the one where you would like to add this component, or start a new one.  For more about creating and editing dashboards, check out: Cloudy's Chalkboard: Creating Dashboards

When you are on the correct dashboard, click "edit"

Step 3: Drag a table component onto the dashboard


Step 4: Drag the correct report onto the component.


Note that you must switch from the "Components" tab to the "Data Sources" tab in the Dashboard Builder palette on the left side.  

(For instructions about how to build this report, see last week's post: 

Cloudy's Chalkboard: Tracking the stars in your salesforce universe - Part 1)


Step 5: Edit the table

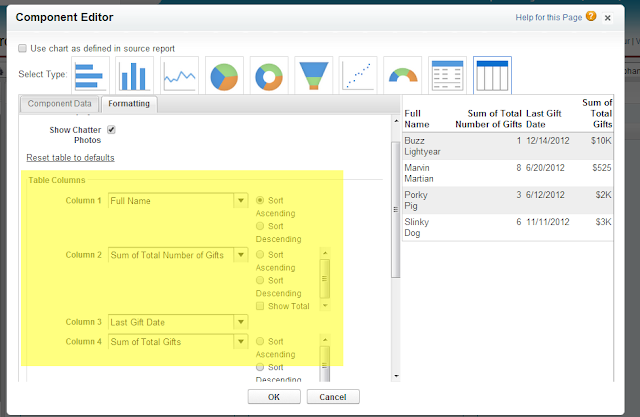
The default settings of the table that appears will only show 2 columns.  Click the wrench in the upper right corner of the table to see more options.

On the Component Editor that appears, choose the Formatting tab and click "Customize table".  You will now be able to edit the table columns to show all four data points: 

Congratulations! You have created a complex dashboard table that will allow you to keep track of important donor relationships that might be at risk.  Consider scheduling this dashboard to refresh regularly, and/or have it emailed to interested parties automatically.

Following similar steps, you can create tables to track other parts of your business as well. If you would like help with your reporting and dashboards, Contact Us!

Tuesday, October 1, 2013

Cloudy's Chalkboard: Tracking the stars in your salesforce universe - Part 1

Who are the STARS in your salesforce.com org?
Who are your 
STAR clients?

Are any of those 
relationships at risk?

If you are using salesforce.com CRM, you understand the idea of Customer Relationship Management: you want to track the relationships and transactions of your customers or constituents and gain a 360 degree view of your business. You know that you can look at a single contact record and see all of their information, including lifetime transactions, campaign involvement, and activity history. 

But how do you leverage that information at a higher level?


Let's learn how to create a complex dashboard table that displays critical relationship updates at a fictitious nonprofit organization called Cartoon.org:


Donor Relationship Dashboard
This example relies on some fields that are standard
in the salesforce.com Non Profit Starter Pack.
A for-profit company can create a metric to fit their business
using the same basic process described here.
Cartoon.org puts a high value on two types of donors:

1) Those who have donated more than $2,000 in their lifetime.


2) Those who have donated more than 5 times in their lifetime, regardless of amount.


These donors have shown, either by the amount OR frequency of their donations, that they are invested in the mission of Cartoon.org: it would be unwise to let those relationships founder!


The head of development at Cartoon.org wants to see a table of these high-value donors who HAVE NOT DONATED in the last six months. She will use this information to target these donors with some special attention to make sure they don't forget about their favorite charitable organization!


This two-part demo will show you how to create this report and dashboard for your organization.


Step 1: Create a new report


Go to Reports>New Report>Accounts & Contacts>Contacts & Accounts>Create

("Accounts" may be renamed "Organizations" in your org!)

Step 2: Set Filters and Filter Logic


Standard Filters:
Show = All Accounts (/All Organizations)
Date Field = Created Date
Range = All Time
Custom Filters:
Total Number of Gifts >= 5
Total Gifts >= $2,000
Last Gift Date < "6 MONTHS AGO"

(**NOTE: You will probably need to adjust the custom filter values to reflect donation totals, donation frequency, and time frames that are meaningful to your organization!)


Finding at-risk relationships
Filter Logic:
Adjust the filter logic by clicking the little down arrow next to "Filters" and select "Filter Logic".
The default logic that is displayed will be "1 AND 2 AND 3".
Edit it to be "(1 OR 2) AND 3" as shown above.

Step 3: Set Columns and Summarize


You can quickly clear the default columns by clicking "Remove All Columns" Link


reporting in salesforce.com

Add the four columns we need for this report: 

Name, Last Gift Date, Total Number of Gifts, and Total Gifts

Summarize the two "Total" columns:

Hover over the column header, click the down arrow, select "Summarize this Field" and click "Sum" on the dialogue box.

Step 4: Add report groupings


Group by "Last Gift Date" and "Name":

Hover over the column header, click the down arrow and select "Group by this Field" for both columns.
Report grouping in salesforce.com

Run the report; it should look like this: 

salesforce.com run report


Step 5: Save your report


Click "Save" and save your report with a meaningful name and description.  


* * * * * * * * * * * * * * * * * * * * * * * * * * * * * * * * * * * * * * * *

This report is ready to be shared 
with your development team: 

These are your most important at-risk donors.


Make a plan to follow up with them!


* * * * * * * * * * * * * * * * * * * * * * * * * * * * * * * * * * * * * * * *


Tune in next week to create a handy dashboard component with this information.


If you would like help creating more meaningful reports and dashboards for your organization, Contact Us!


More dashboard tutorials from Cloudy:

Cloudy's Chalkboard: Creating Dashboards


Tuesday, September 3, 2013

Cloudy's Chalkboard: Use a Workflow to send an Email

Using workflows in salesforce.com to automate your business processes saves you time, money and frustrating busywork. Today, we will set up a workflow to send an email. Emails can be automatically sent not only to salesforce.com users, but to other employees, business partners, and customers. Merge fields in the email template can bring in the recipient's name as well as other information from their record.

If you are not yet using workflows, you might not know when you should use one! Here are some examples of when you might use a workflow to send an email:


-When an Opportunity worth more than $50k is Closed-Lost, the sales manager should be notified for follow-up.

-When a Sales Rep completes a demo with a client, a Thank You email should be sent to the client.
-When a new Account is created in a given geographic location, the regional manager should be notified.

These specific examples might not apply to your business, but can help you start thinking about the kinds of events and processes in your org that should trigger an automatic email or alert.


****************

Let's use the example of the Thank You note after a demo. After completing a product demo with a contact, the Sales Rep marks a custom checkbox called "Demo Participant"  on the contact records of the participants.  When this box is checked, we want to automatically send out a personalized thank you email to that contact.
Step 1: Create the Email Template


The Merge Fields on your template should be related to "Contact." For step-by-step instructions to create an email template, check out Cloudy's Chalkboard: How to Create an Email Template. Be sure to mark the "Available for Use" checkbox before you are done!


Step 2: Create the Workflow Rule

  • Go to Setup>Create>Workflow & Approvals>Workflow Rules and click "New."
  • Select the object where the trigger action will occur. (In this case, "Contact".) Click "Next".
  • Name and describe the rule. As a best practice, begin the rule name with the name of the object, or an abbreviation thereof. (When you have a lot of workflows, this helps keep related rules grouped together in the list.)
  • Under Evaluation Criteria, choose "created, and any time it's edited to subsequently meet criteria".
  • Under Rule Criteria, define the field values or formula test that will trigger the action. For this example "Contact: Demo Participant" + "equals" + "TRUE"
  • Click "Save & Next"


Step 3: Add the Workflow Action


  • Select "New Email Alert" from the Add Workflow Action menu. A new screen will appear.
  • Add a short description (the unique name will auto-pupulate based on the description).
  • Select your email template from the lookup.
  • Under Recipient Type, select "Email Field" and from the dual panes below, select the correct contact email address.
  • Click "Save." On the final screen that appears, click "Activate".
You are ready to test your workflow!

If you would like help adding process automation to your salesforce.com, Contact Us!

Thursday, August 22, 2013

Cloudy's Chalkboard: Email Template Pro Tips!

Salesforce Pro Tips
In Cloudy's last two posts, you learned how to set up salesforce.com email letterheads and templates. Once you get started with email templates, you won't want to quit! The possibilities for saving time and streamlining processes are many, but you will encounter questions and roadblocks as your imagination kicks in. Here are a couple of Cloudy's favorite Pro Tips for getting the most out of Email Templates:

Pro Tip #1: Merging information from related records

You may have noticed that unlike elsewhere in salesforce.com (such as in the advanced formula editor), the Merge Field menu does not allow you to navigate through layers of related records to grab the Merge Field you want. For instance, if you are sending a Contact-related email, you cannot insert a field from their related Account record.

Get around this by adding a formula field to the Contact record which captures the related Account field that you need for your email! You don't have to put this field on your page layout, and you may want to give it a distinctive name and description so that you and other administrators can easily remember its function.  ie. "THIS IS AN EMAIL TEMPLATE FORMULA FIELD!"

Pro Tip #2: "Sending User" Information


If you have numerous reps all using the same Template to email Contacts, you may want a way for each rep's contact information to populate in the template automatically - for instance, as a personalized "signature".


Simply select "Sending User Fields" from the "Select Field Type" picklist.  Whereas most of your template merge fields must come from the Object that the email will be related to (ie. "Contact"), the Sending User fields are an exception.
This merge field will allow the recipient to easily call the rep who sent the email.
**IF YOUR "SENDING USER" MERGE FIELDS ARE NOT POPULATING CORRECTLY: check that the correct user information is entered on the User record!

Pro Tip #3: Dynamic URLs

You can add a basic URL link by:

1: Type the text as you would like it to appear and highlight it.
2: Click the LINK icon on the tool bar.
3: Enter the web url in the box that appears.


But what if you don't want to link to a STATIC website, and instead you want to send a dynamic/individualized URL based on the record you are sending from?

Simply create a URL field on the primary object, and populate it with your individualized URL links. Then on your template, follow the same steps as above but paste the MERGE FIELD for your new URL field in the text box.
You now have a dynamic URL link that will change based on the record it is sent from!

These are just a few of Cloudy's favorite email template tips.  If you have more questions about advanced functionality with salesforce.com email templates, Contact Us!

Related Posts:

Cloudy's Chalkboard: How to Create an Email Letterhead

Cloudy's Chalkboard: How to Create an Email Template


Monday, August 5, 2013

Cloudy's Chalkboard: How to Create an Email Template

Hopefully you are already using the emailing capabilities of salesforce.com to not only streamline and automate your email processes, but to capture relevant records of all your client communications!

Last time, Cloudy illustrated the steps to create an email letterhead. A themed letterhead with your logo will give your emails a consistent, branded look and feel. Today we will create an email template.  


With email templates you get simplicity and quality control:
  • Standardize the email messages used by your team.
  • Keep all messaging in line with your brand.
  • Enhance speed and productivity.
  • Personalize with easy merge fields.
Step 1: Create a new email template Go to Setup>Communication Templates>Email Templates.
  • If you do not have any custom template folders set up, this is a good time to create one! Just click the "Create New Folder" link next to the Folders menu and give your new folder a distinctive name, such as "Your Company Name Email Templates".
  • Click the "New Template" button.
  • Select "HTML (Using Letterhead)" 
Step 2: Name your template
  • Confirm the correct destination folder is selected.
  • Check the "Available For Use" check box.
  • Name your template - be descriptive!
  • Select the Letterhead you created last time from the menu
  • Choose an email layout; for your first template, try the "Free Form Letter" and check out the other options at another time.
  • Enter a detailed description of the content and intended use of this template.
  • Click "Next".
Step 3: Compose your email template Read the tips at the top of this salesforce.com page!
  • Start by typing the text as you would like it to appear. Note where you would like to insert merge fields; for instance "Dear FIRST NAME,"...
  • When the basic text is in place, you are ready to insert merge fields! In the "Available Merge Fields" tool bar, select the OBJECT that this email will be sent from or related to. CONTACT is the most common choice, but Leads and Opportunities are also common. The Object you choose should be the one that contains the information you want to use as merge fields.
  • After selecting the object, find the field you want from the second picklist. ie. "First Name"
  • The Merge Field "code" will appear highlighted in the third field of the tool bar. Copy and paste it into the correct position in your template.

  • When you are ready to test the template, click next, copy your content into the Text-only editor, and click "Save." Now you will see a button to "Send test and verify Merge fields."  If the test goes well, your template is complete!
Tune in next week for Cloudy's Email Template Pro Tips!

If you would like Cloudy's help with salesforce.com templates or anything else, please CONTACT US!


Monday, June 17, 2013

Cloudy's Chalkboard: How to Create an Email Letterhead

Creating an email letterhead is the first step toward fully harnessing the power of email from within salesforce.com.
If you are not already using email within (or integrated with) your salesforce.com, let's briefly consider a few benefits of doing so:
  • 360 degree view of all communication with a Contact:  As you and your teammates communicate with your contacts, all emails are tracked on the contact record so that everyone can see the full story of those interactions (alongside logged calls and other activities).
  • Automation: If you are using the Enterprise or Unlimited edition of salesforce.com, email messages can be automatically sent and logged, based on criteria you set.
  • Consistent messaging: By utilizing Letterheads and Templates, you can standardize your messaging, reduce the time spent composing emails, and give all your emails a consistent brand identity, using a Letterhead with your colors and logos.

Get started down this path by following along with Cloudy to create a salesforce.com letterhead like this simple example:

With just a logo and a few color choices,
 Redpath now has a letterhead that will ensure a consistent,
branded look for all of their outgoing email.

Step 1: Upload your logo (or other image) to the Documents tab in your salesforce.com. 
  •  If you cannot see this tab, find it by clicking the "+" to the right of your tabs.  
  • If you don't have any document folders set up, you can create one by clicking the "Create New Folder" link.  For instance, create a folder called "Logos."
  • Before uploading, make sure the logo is the exact size you want for the Letterhead.  Unlike other familiar document and image interfaces, such as Word or Google Docs, you will not be able to adjust the size of the image after loading it. (If you make a mistake on the size of the image, simply replace your original image or load it as a separate document.
  • Be sure to select the "Externally Available Image" checkbox!

Step 2: Create the Letterhead Go to Your Name> Setup> Communication Templates> Letterheads> New Letterhead.

  • Give your letterhead a descriptive name and be sure to check the "Available for Use" checkbox. Click "Next".
  • On the Letterhead edit page which appears, add your Logo by clicking the "Select Logo" button and finding the logo you uploaded in the correct folder.  If you do not see your logo in the correct folder, you probably forgot to select the "Externally Available Image" checkbox!  You can fix it by going back to the Documents tab, find the logo, click "edit" and select the checkbox.
  • Click through the other "Edit" boxes on the Letterhead editor to choose colors and styles for the rest of the letterhead.
  • Click the "Preview" button above the editor to see how it looks!
  • Click "Save".  (You can always come back and edit it more later)
Your Letterhead is ready to use. Try it out by navigating to a contact record and clicking "Send an Email." on the Activity History related list.  At the top of the email interface that appears, you will see a "Select Template" button.  (If you do not see your template in the pop-up dialogue, you probably forgot to select the "Available for Use" checkbox!  You can fix it by going back to the Letterheads page, clicking "edit" next to your letterhead, and marking the checkbox on the edit page.) With just this set up, you can send free form emails from salesforce.com that will have a consistent company brand, and the emails will be automatically attached to the correct contact records.

Next week, Cloudy will help you reach the next level of emailing in salesforce.com by creating Email Templates!

Read more Cloudy's Chalkboard tutorials:
Cloudy's Dashboard - Create Roll-up Summaries
Cloudy's Dashboard - Creating Dashboards


Monday, June 3, 2013

Cloudy's Favorite Apps: Apsona

Have you ever wished you could import and export all of your salesforce.com data without firing up an external application or digging out your security token?

Have you ever encountered the limits of Salesforce.com reporting, wished that you could create more sophisticated reporting filters, or gotten frustrated while managing a list of custom report types?

How much time would you save if you could perform inline-editing on a whole list of records, without clicking into each one individually?

What if you could realize all of these functions and more with a single inexpensive app?

Apsona is one of Cloudy's favorite AppExchange apps, with such varied and powerful functionality that it can benefit any organization. What's more, nonprofits have access to 10 free licenses! 

Cloudy recently created an awesome report for a nonprofit client, allowing them to see which of their donors contributed to last year's matching grant Campaign, but did not contribute to the same Campaign this year. This insight will enable them to do a targeted and informed "ask" of those invested donors for this year's matching grant challenge!  The information on how to create this report using nested filters was right on the Apsona website:


The Apsona Website has lots of eye-opening use-cases and tutorials like this one!
Surely you are already considering the possibilities, but here are even more exciting ideas to ponder:

-Create Exception Reports: ie. Show all Accounts WITHOUT Opportunities
-Quickly change record ownership en mass.
-Import into multiple objects.
-Cleanse and import data in a single, integrated process.

Visit this page for some short, informative demos to see how powerful yet simple Apsona can be: Apsona Demos on the AppExchange 

If you would like help evaluating this App for your salesforce.com, installing it, or creating your first custom reports, CONTACT US!


Read Cloudy's reviews of other popular Apps:
Form Assembly
Conga Composer
Flip Top Social Profiles
Dupe Catcher
Rollup Helper


Wednesday, May 29, 2013

Makeover Magic: Page Layouts!

One of the most impactful things you can do in your salesforce.com to increase adoption, satisfaction, efficiency, and productivity among your users is to give your page layouts and related lists a makeover

It's true!  While custom fields, relationships, formulas, workflows and reports are the workhorses that make your salesforce.com such a powerful tool, it is hard to harness that power if the environment is not optimized.  New users can be confused and discouraged by complex customizations that are cramped and cluttered.  And as you know, poor user adoption leads to bad data and frustrated admins!

Check out these dramatic before & after photos to see the difference a page layout makeover can make.

Page Layout Detail View:

Related Lists


Take a look at your records with these ideas in mind.  For even more about page layouts, check out this post from Mike at buttonclickadmin.com: How to Make Your Salesforce Page Layouts Awesome.

If you would like some help optimizing your salesforce.com org, Contact Us!  The consultants at Redpath are experts in salesforce.com evaluation, field utilization analysis, data validation and cleanup, and general salesforce.com tune-ups.  

Monday, April 29, 2013

Cloudy's Favorite Apps: DupeCatcher


The number one Salesforce.com data quality complaint at most organizations is duplicate accounts and contacts.  Without safeguards in place, it can be all too easy to add duplicate records.  When this problem reaches a critical threshold, is it impossible to trust your data and make the daily decisions that depend on it. 


Salesforce.com experts and developers have many strategies, tools, and apps to address this common issue, including proper search technique for users and good matching criteria for data uploads.  The third strategy used by many companies who are winning the battle against "dupes" is DupeCatcher from Symphonic Source.  This simple, free app stops dupes on their way in, based on rules that you define.  


If you have never installed an AppExchange app in your Salesforce.com org, DupeCatcher is a great first choice.  Start the process by going to the AppExchange listing and clicking the green "Get it now" button.  After you follow the step-by-step directions to install it in your org, you will find you have a new listing for Dupecatcher in the App menu drop-down in the upper right corner of your Salesforce.com.  If you click on it, you will have a new view of the collection of tabs that comprise the DupeCatcher App.  To start blocking dupes in your org only requires two steps:


Step 1: Create a Filter

On the "DupeCatcher Filters" tab, click "New" to create a new filter.  From the drop-downs, select whether the filter will apply to Contacts, Accounts, or Leads and define the action you want to occur when a duplicate is detected.  For instance, do you want the duplicate to be completely blocked, or just display a warning to the user?

Step 2: Define the Filter Rules

Once you have saved your filter, it is time to define the duplicate-matching criteria.  On the filter record, scroll down the the DupeCatcher Filter Rules related list and click the "New DupeCatcher Filter Rule" button.  You will probably want to add several rules to have a well defined filter.  

Here is an example of a good set of rules for one contact filter:


Resources:

DupeCatcher on the AppExchange <--Go here to download to your Salesforce.com org
www.DupeCatcher.com <--For more information and resources about this app
Cloudy's favorite: Quick-Start Guide from DupeCatcher
Cloudy's Step-by-Step Direction to install an app

For more of Cloudy's advise about Dirty Data:

Clean ALL the Data!!! Part I
Clean ALL the Data!!! Part II

If you would like help setting up DupeCatcher in your org, if you are struggling with duplicates and need help cleaning up the mess, or if you would like more resources and training on how to effectively manage your data, please Contact Us!


More of Cloudy's Favorite Apps:
FormAssembly
Rollup Helper
Conga Composer
FlipTop

Monday, April 22, 2013

Cloudy's Top Ten: About Salesforce.com User Groups


"None of us is as smart as all of us" - Ken Blanchard

10 - Salesforce.com helps organize User Groups all over the world.  Search for a meeting near you.

9 - If there is no User Group near you, Salesforce.com will help you start one by providing resources and training to help you get started.  Check out this ButtonClick Admin post and podcast for great additional information about leading a Salesforce.com User Group.

8 - User Groups are an excellent free way to develop your Salesforce.com knowledge and skills in an engaging, structured, and social environment.

7 - They are a great place to meet smart and enthusiastic Salesforce.com users.  The next time you want to brainstorm, you might have a new friend to call.

6 - User Groups are an excellent resource to find out about job openings and career opportunities in other organizations that are using Salesforce.com.  

5 - Speaking of other organizations, there is tremendous value to be found in building your professional network among other businesses that are using similar technology tools.  You will learn how other businesses are leveraging the cloud to enhance all their business processes, from Marketing, to Sales, to Customer Support.

4 - If you have trouble keeping up with the seasonal releases and new features of Salesforce, User Groups can be a place to get these updates in an easy format.

3 - While most User Groups attendees are regular users and admins, Salesforce.com Partner Consultants are often in attendance as well.  There are rules that make sure they don't use the opportunity to try to sell you anything, so it can be a great opportunity to get novel ideas and best practices advice from the experts.

2 - Salesforce.com AppExchange vendors are enthusiastic to demonstrate their products at User Groups, whether via a virtual presentation or by sending a representative to your group.  This is a great way to learn about powerful and interesting apps, and to learn how other businesses are using them.

1 - User Groups are run by other users on a volunteer basis, so they are likely to be very responsive if you would like to help or add your own ideas to the mix.  If you are interested in leadership opportunity to enhance your resume and grow your own Salesforce.com knowledge and skills, consider offering to do a presentation at your user group, or joining the leadership team.


Cloudy and the team at Redpath Consulting Group are involved in several Salesforce User Groups in the Twin Cities, MN area, including the general area user group, as well as smaller groups for nonprofit users and for Salesforce.com developers.  Contact us if you would like to find out when the next meetings of these groups will be held, or if you would like to get in touch with Twin Cities area group leaders.